> Microsoft Entra ID (Azure AD)
It takes four steps to create a SAML-2.0 identity provider in Microsoft Entra ID
Prerequisites
Please make sure you have the permission to create Enterprise applications in Microsoft Entra ID (Azure AD).
1. Log in to the Azure Portal at https://portal.azure.com/ .
2. In the Azure services section, choose Microsoft Entra ID.
3. In the left sidebar, choose Enterprise applications.
4. Click New application.
5. On the Browse Microsoft Entra Gallery page, click Create your own application. Please contact your Azure admin for permission if the button is greyed out.
What’s the name of your app? --- Enter a name for your application, e.g. DevInsight.What are you looking to do with your application? --- choose 'Integrate any other application you don’t find in the gallery (Non-gallery)'.Click Create. 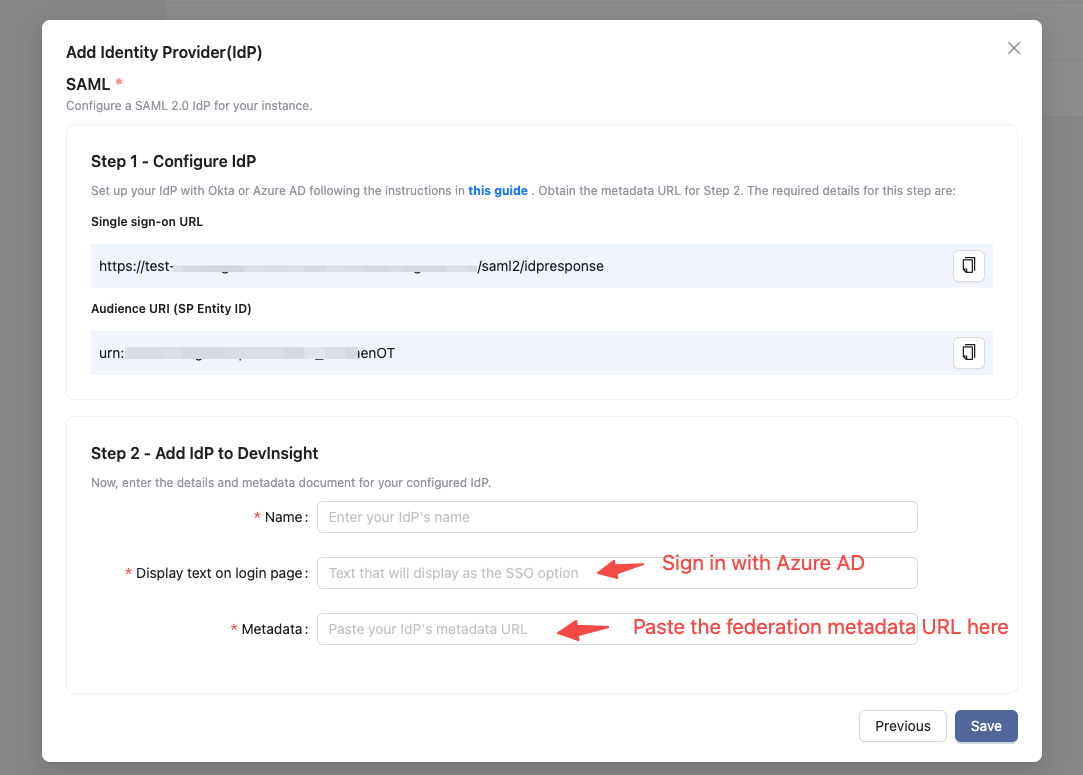
It might take a few seconds for the application to be created. Then, you will be redirected to the Overview page of this new application.
Note: Occasionally, this step might result in a 'Not Found' error, even though Azure AD has successfully created a new application. If that happens, navigate back to Enterprise applications and search for your application by name.
1. Scroll down to the Getting started section, in 2. Set up single sign on , click Get started.

2. On the next screen, click SAML. A few configuration steps will be shown.
3. In the Basic SAML Configuration section, click Edit. In the pop-up page:
Add an identifier with the Audience URI (SP Entity ID) which can be found at the DevInsight IdP creation page.Add a Reply URL (Assertion Consumer Service URL) with the Single sign-on URL which can also be found at the DevInsight IdP creation page.Click Save and close the pop-up by clicking the X button on the top right corner.
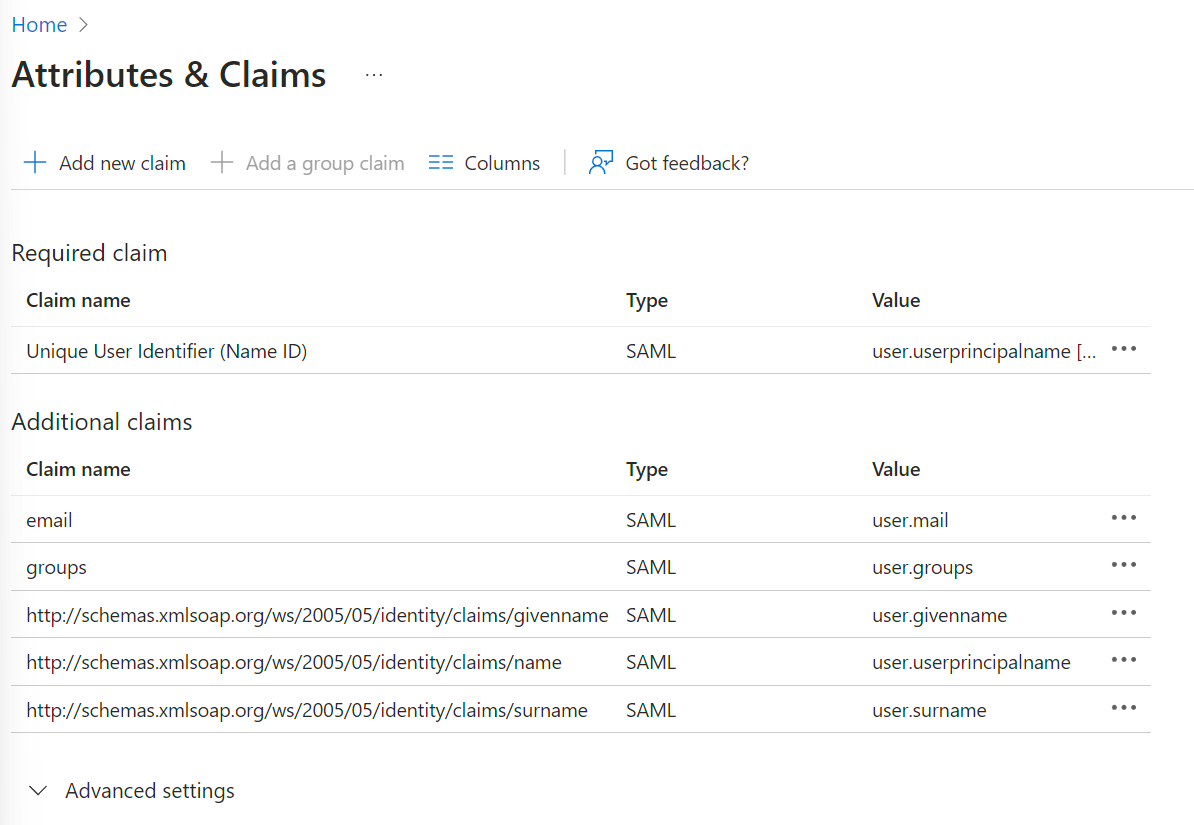
4. In the Attributes & Claims section, click on Edit. On the pop-up page:
Click Add a group claim. On the Group Claims screen:Select 'Security groups'Set Source attribute to 'Group ID'.Expand Advanced options:
- Check 'Customize the name of the group claim'
- Set Name to 'groups'Click Save.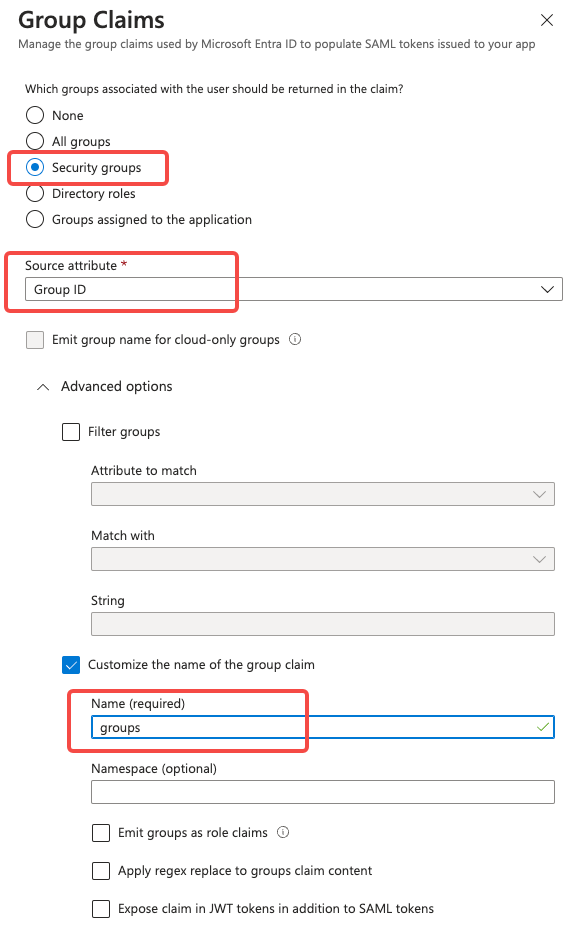
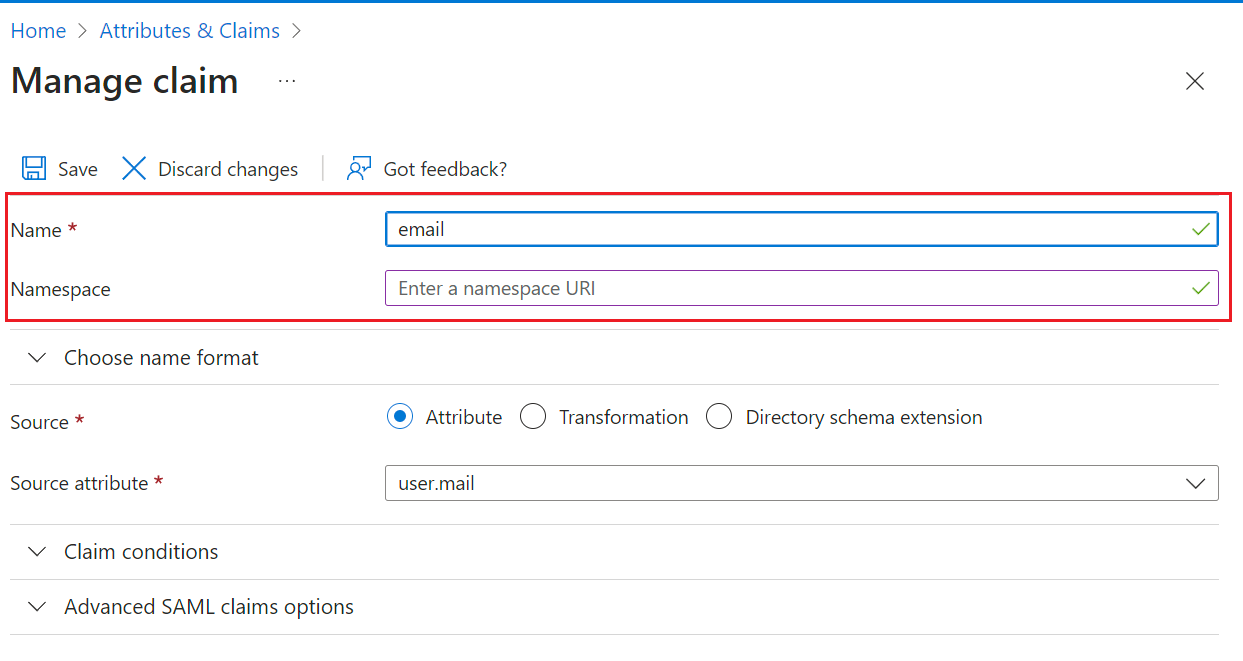
5. On the Attributes & Claims page, go to the Additional claims section, click the row with Value=user.mail
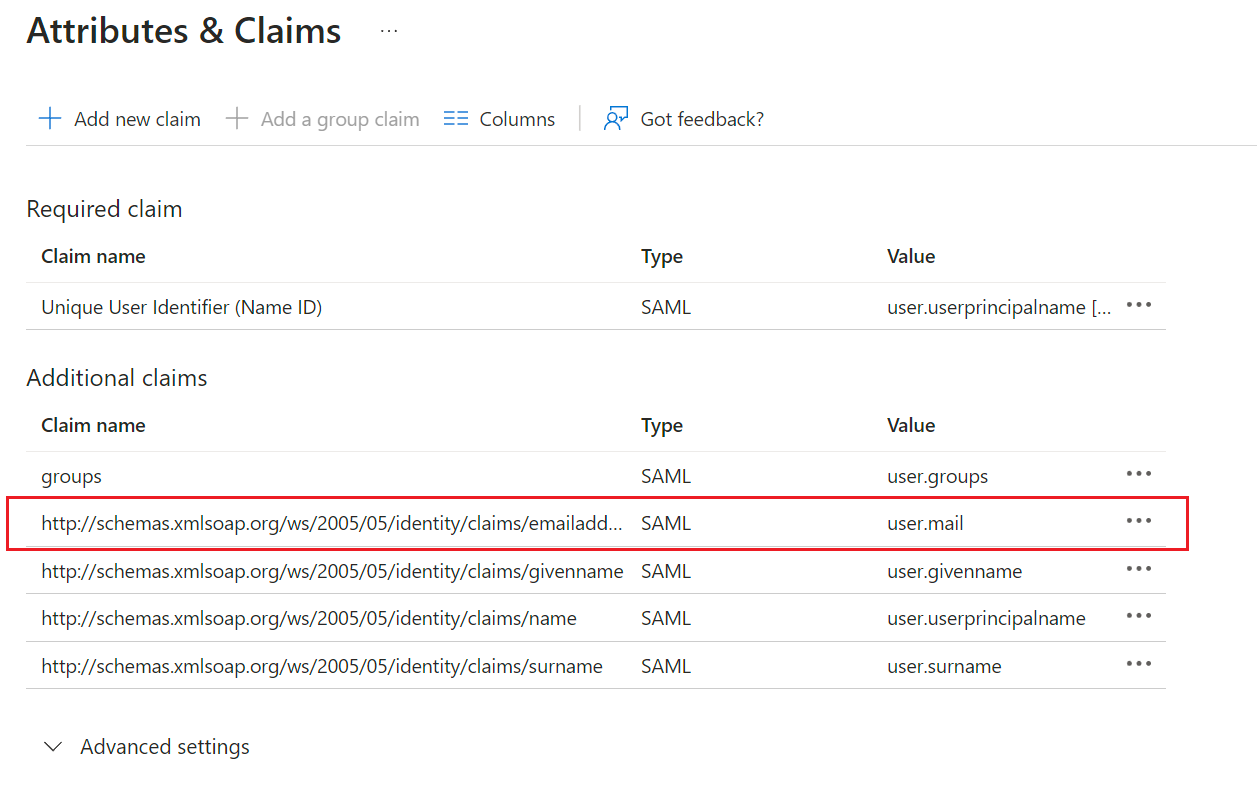
6. On the Manage claim page, set 'email' as the Name and remove the existing Namespace. Choose Save.
The final result should look like the following figure:
7. Close the Attributes & Claims screen by choosing the X on the top right corner. You will be redirected to the SAML-based Sign-on page.
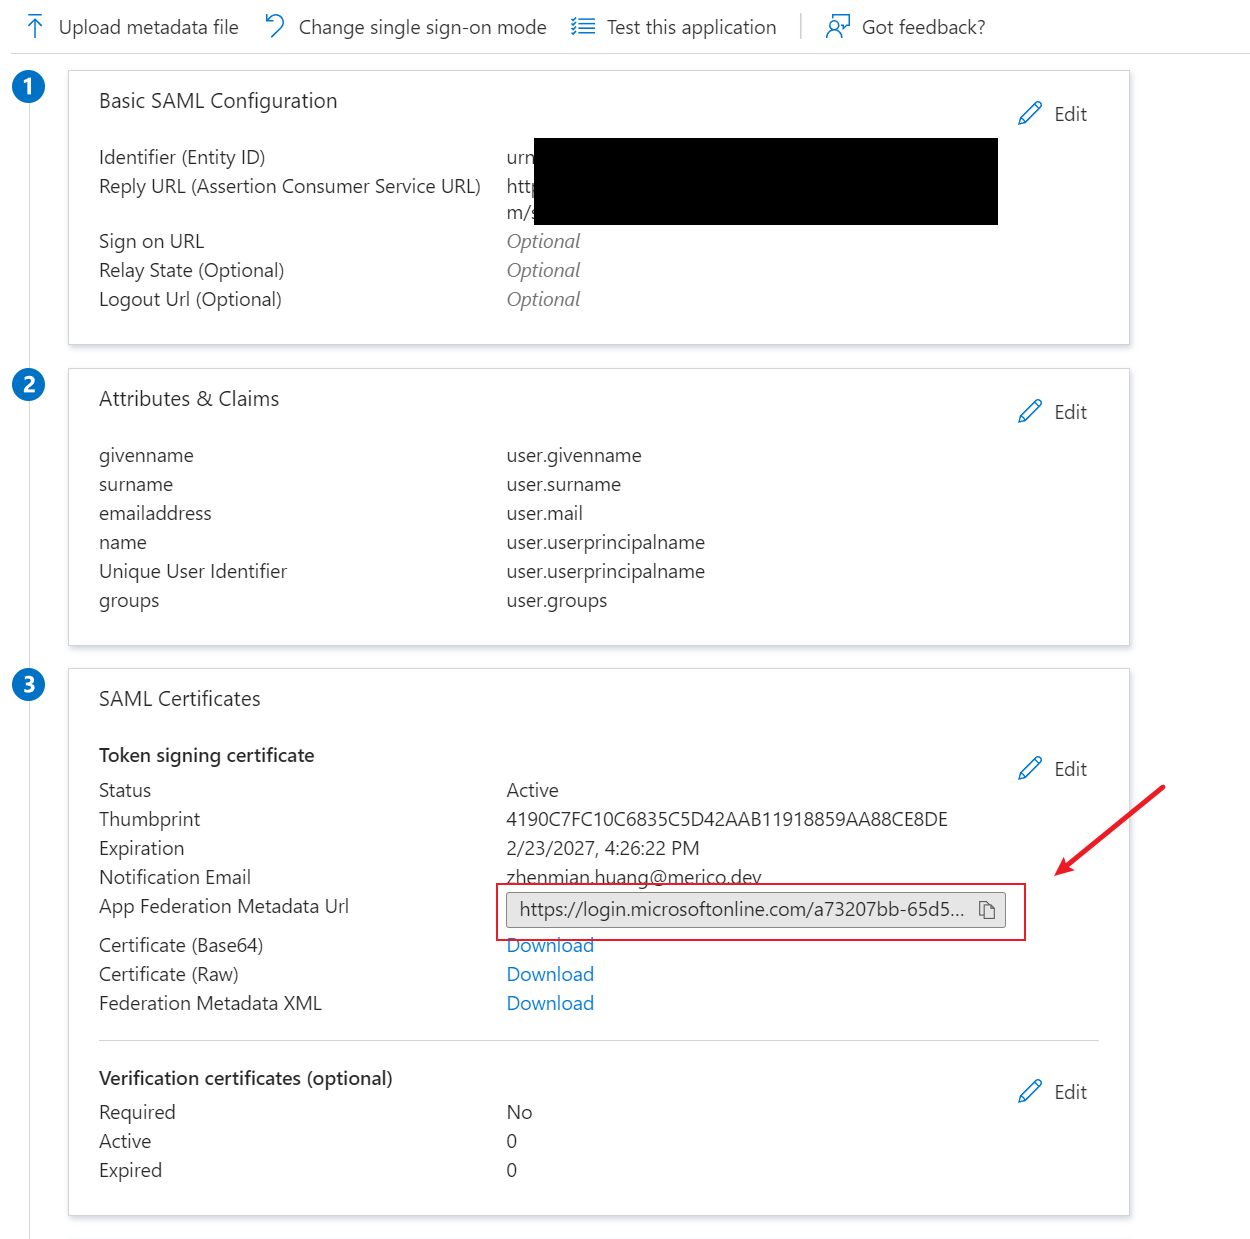
8. Scroll down to the SAML Certificates section. Copy the App Federation Metadata Url for later use.
Now, the enterprise application for DevInsight is created. You need to continue configuring groups and members to determine the roles for users to access DevInsight.
It is recommended to create three new groups (DevInsightAdmin, DevInsightEditor, DevInsightViewer) to map Azure AD groups to DevInsight roles. Once the new groups are created, you can add your existing groups or members to them.
1. In the left sidebar of the Microsoft Entra ID Overview page, go to the Groups under the Manage section
2. Click New group, fill out the form according to the following steps
Group type: Choose 'Security'Group name: Enter 'DevInsightAdmin'Membership type: Choose 'Assigned'Click on No member selectedAdd your existing groups or members. For instance, if you have a 'DevOps' group and want to grant DevInsight admin permission to it, you should add the 'DevOps' group hereClick Create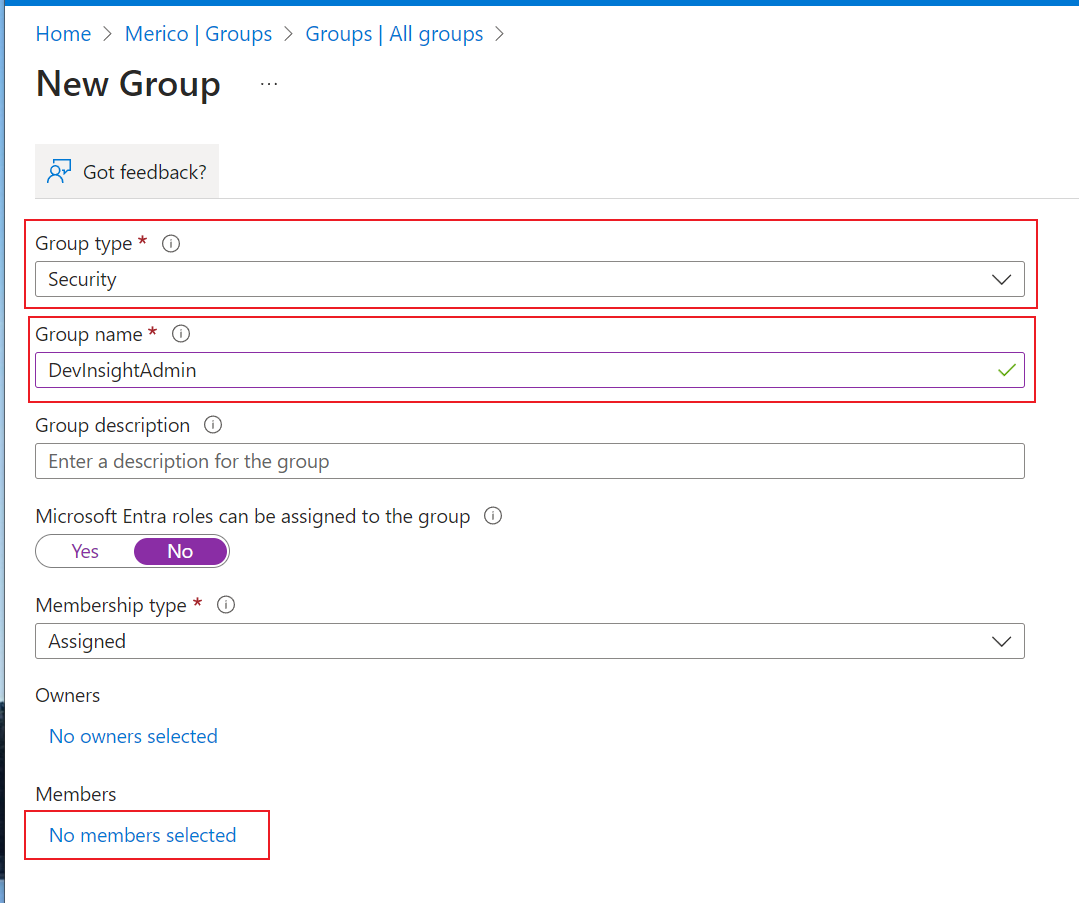
3. Repeat the previous operation to create the following groups and add users to these groups:
DevInsightEditorDevInsightViewerNow, the three groups for each DevInsight role should have been created. Their IDs will be used to map Azure AD groups to DevInsight roles in the following configuration.
1. Navigate to the Enterprise applications page via the Microsoft Entera ID Overview.
2. Select the DevInsight application from the application list to access its Overview page.
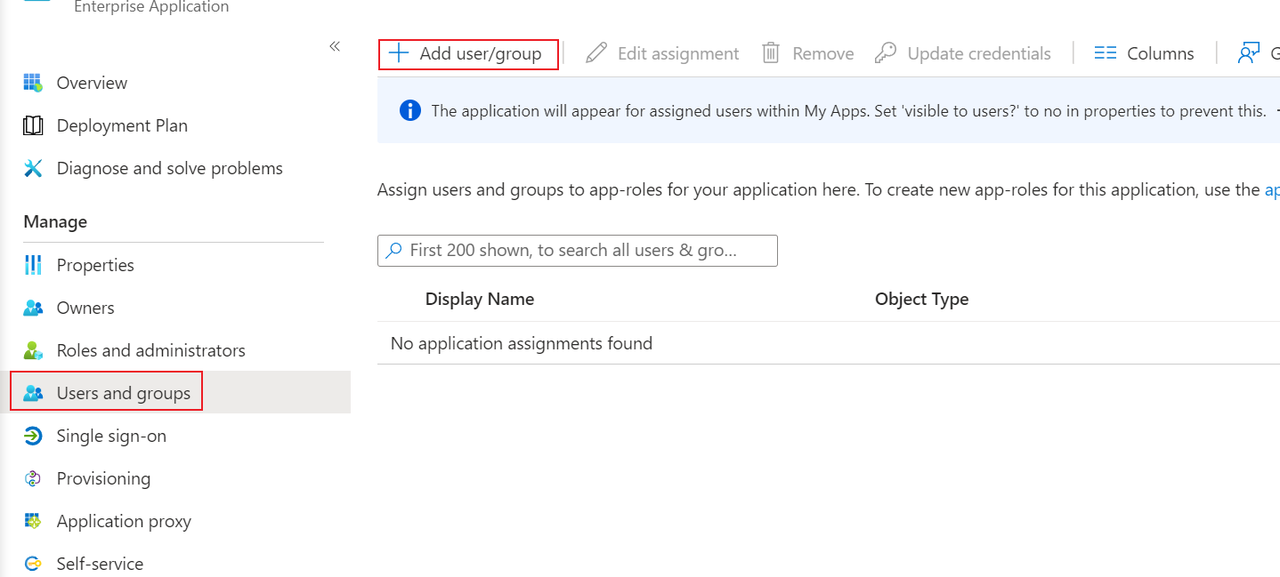
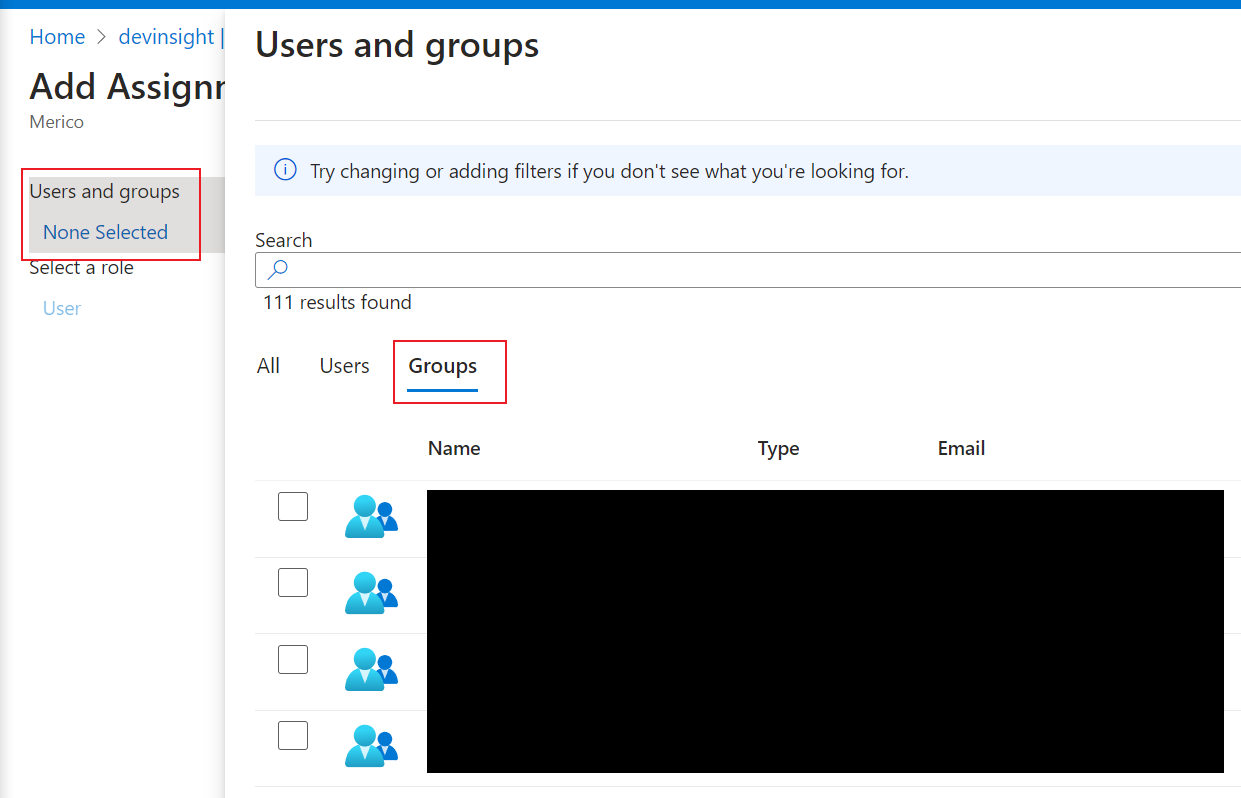
3. In the sidebar, go to Users and groups, then click on Add user/group.
4. In the upcoming screen, click on None Selected under the Users and groups section.
5. Proceed to the Groups tab and assign the relevant groups to the DevInsight application:
6. Select 'DevInsightAdmin', 'DevInsightEditor', 'DevInsightViewer' or any other specific groups you wish to grant access permissions for the DevInsight application.
For groups containing subgroups, you must assign all users from the subgroups to ensure access to the application. This does not cascade automatically to nested groups. Implement this using one of the following methods:
(Recommended) Disable Application Assignment Requirement
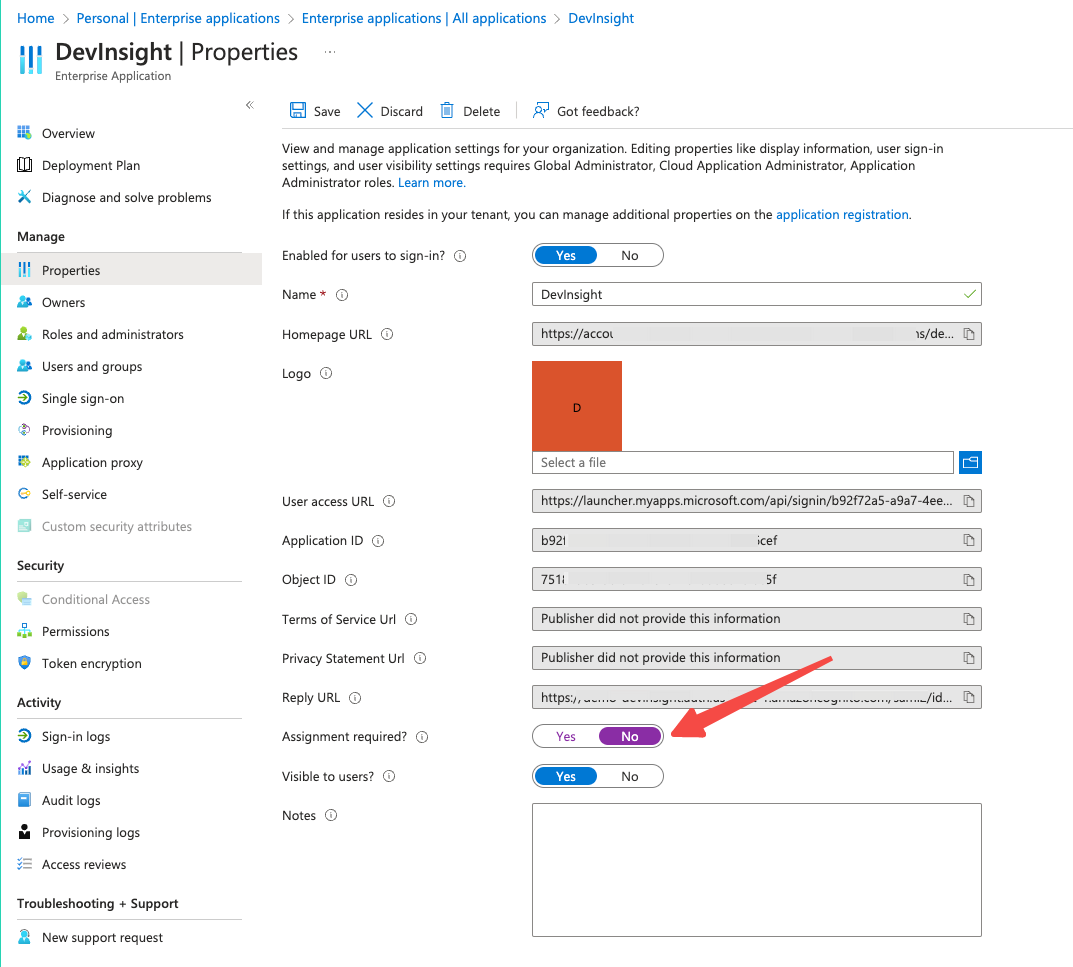
i. Navigate to the Properties page of the DevInsight application.
ii. Locate the Assignment required? setting and toggle it to 'No'. This action permits all users, not just assigned users, to access DevInsight.
Please note that while this setting allows user access, you must still map groups to DevInsight roles in the subsequent steps. Users who are members (including indirect members) of these groups will then be able to log in. If this is not configured, users will receive an error message instructing them to contact Identity Provider (IdP) administrators to request a role within DevInsight.
Assign Subgroups Individually
Assign each subgroup of 'DevInsightAdmin', 'DevInsightEditor', and 'DevInsightViewer' to the DevInsight application to ensure proper access permissions.
7. Upon completing the selection, proceed to the Add Assignment page. Click Assign to finalize the access configuration.
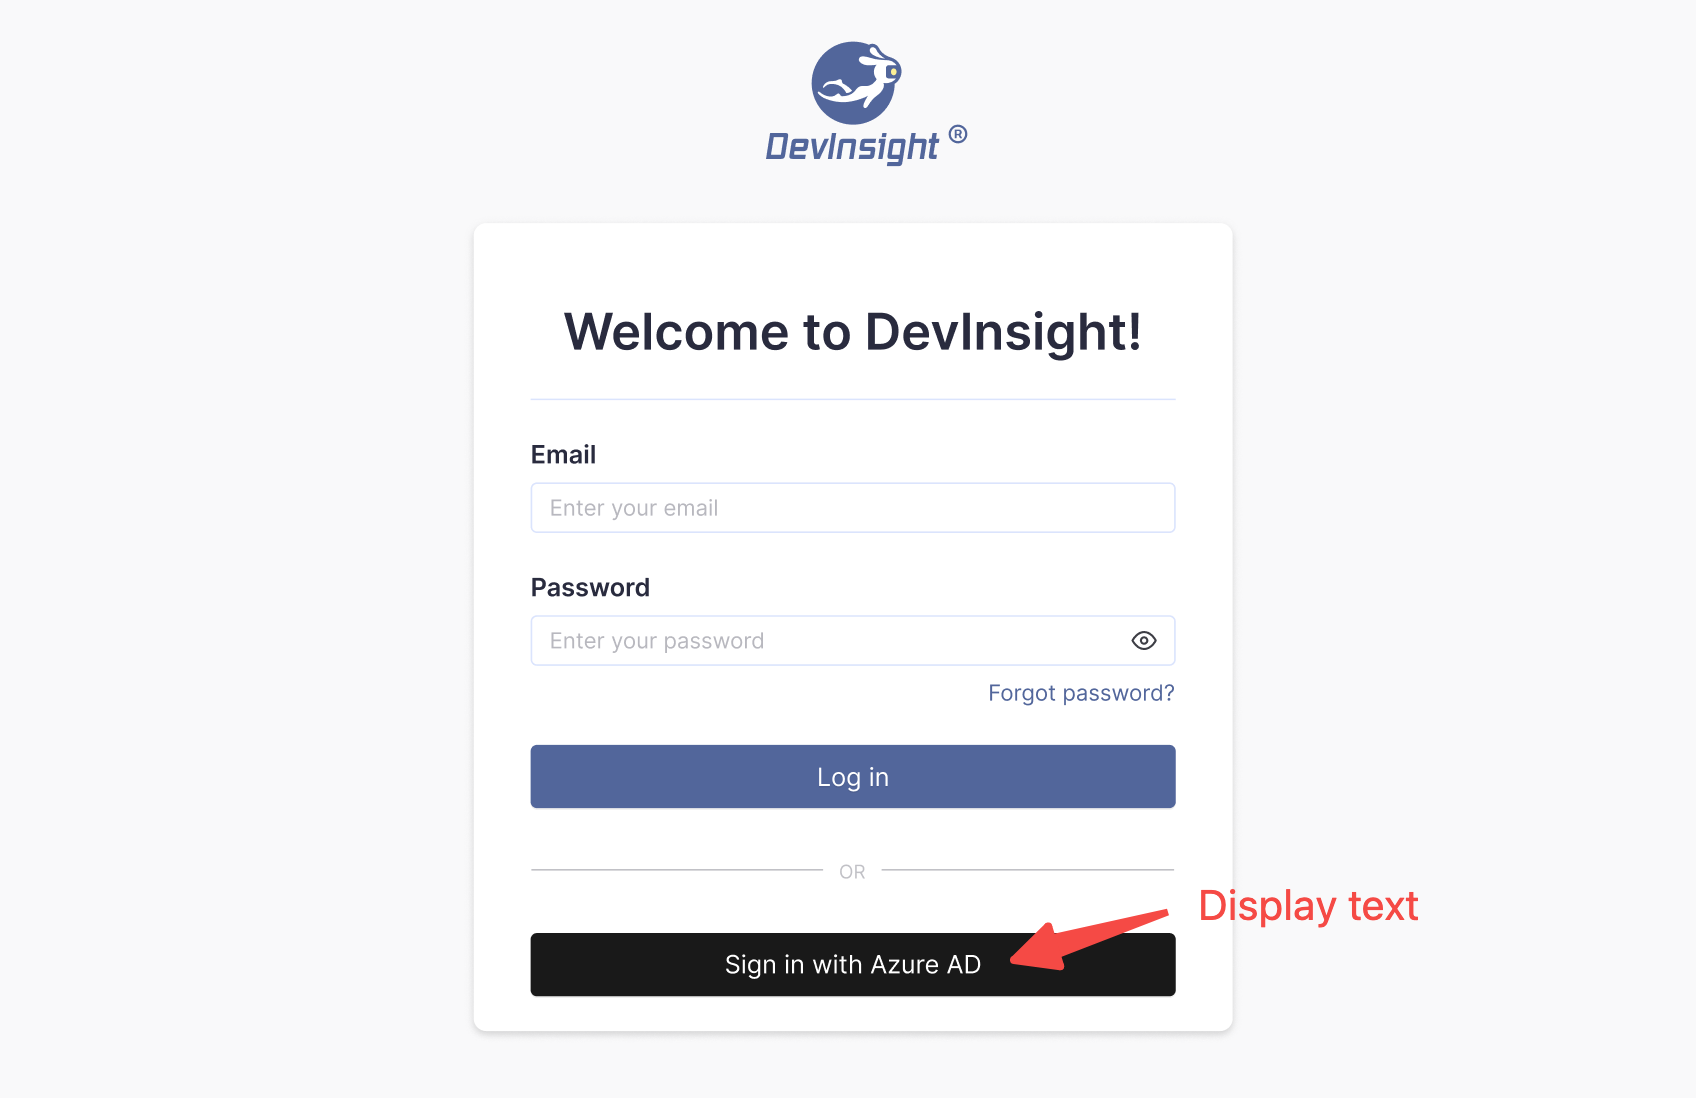
1. Switch back to DevInsight's SSO page. Fill out the form in the step 2 of the 'Add Identity Provider' dialogue:

Name: give your IdP a unique nameDisplay text on the login page: the text shown on the SSO entry. E.g. Sign in with Azure ADMetadata: Copy and paste your App Federation Metadata Url here2. In Step 3 - Group Mapping, copy and paste the Azure AD group IDs corresponding to 'DevInsightAdmin', 'DevInsightEditor', 'DevInsightViewer', or any additional groups you wish to map, into their respective role fields.

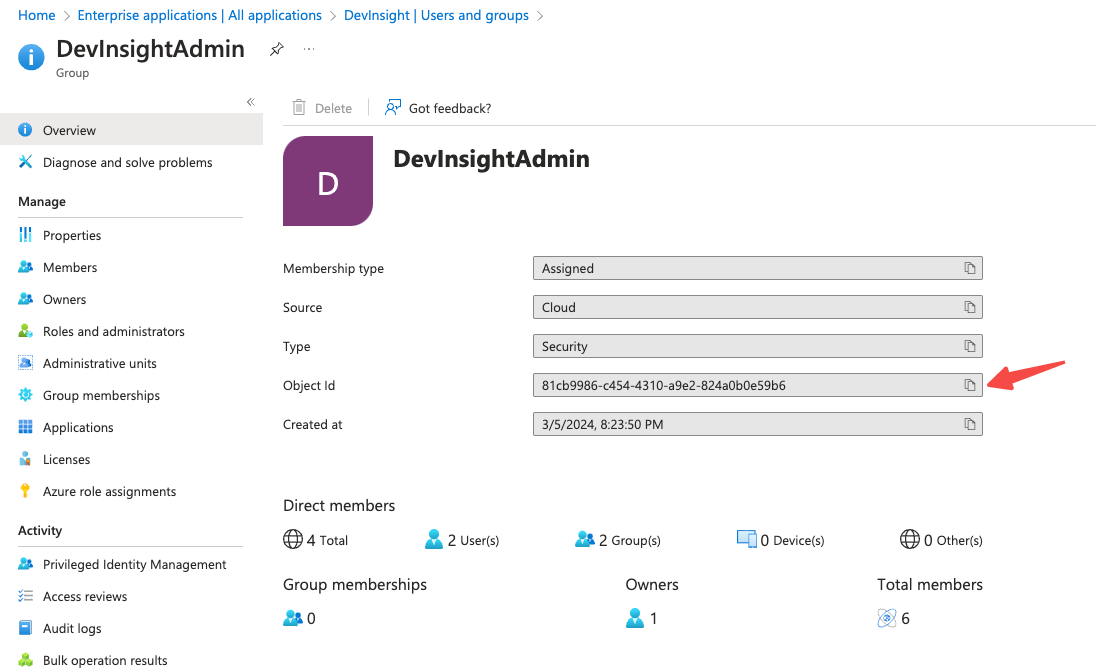
The Azure AD group ID can be found on a group's Overview page, copy the Object id.
3. Click 'Save'.
4. Sign out your current account. The entry of the SSO provider will be shown on your login page.
🎉🎉🎉 Congratulations! You have completed all SSO configurations. Click the button and try it out!